What a great stitch!
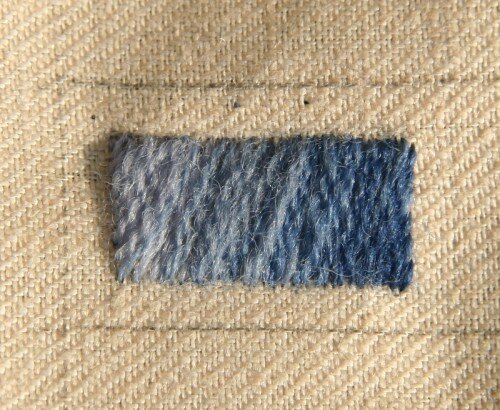
The RSN Crewelwork Preparation Sampler is coming along nicely - in fact, it's coming along wonderfully! I have three more stitches to do and then I'll be working on the border areas between each of the blocks.This afternoon I did the block for Laid Stitch. According to the RSN Crewelwork Essential Stitch Guide, this is one of the main stitches used to fill the Bayeux Tapestry. Laid Stitch wastes very little thread as it covers the front with long stitches and uses short stitches on the back. It looks like satin stitch at first. It can be done all in one color, but the RSN Crewelwork Essential Stitch Guide explains how to do shading with laid stitch and the result looks great! Laid Stitch is worked without outlining the shape first in split stitch, as is done with satin stitch. It's also a stitch that's economical as the long stitches are only on the top of the fabric. When you take the needle through the fabric to the back, you bring it up again directly next to the place you took it to the back. The underside shows only tiny short stitches.Keep reading to learn how to...I decided to work this rectangle using an angled stitch because it looks more interesting. Before I began stitching, I used a pencil and divided the rectangle shape into 4 angled areas to show me where to change threads.
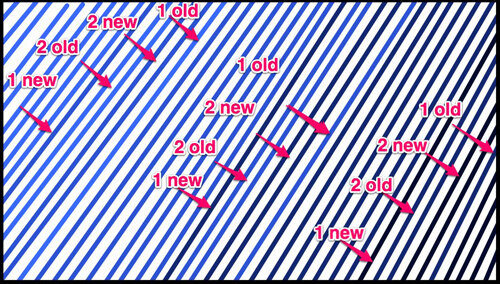
 You will need 4 shades of the same color. I used 4 shades of blue. The closer in color the shades are to one another, the more gradual and gentle the shading will be. To create the beautiful shading you see here, you stitch in the first color until you are ready to change to the next shade. When you are ready to introduce the second color, lay single stitch in the new color. Return to the old color for two stitches. Then make two stitches using the new color, followed by one stitch of the old color. Now continue with the new color.
 The result looks just great. The shading can be done according to the design; it doesn't have to go from light to dark. In fact, the shading could move from light to dark, back to light and then get even lighter, for example. It is a bit tricky to get the edges to look smooth but, if you're unhappy with the edges, just outline the shape with one of the outline stitches - stem stitch, back stitch or split stitch.I can imagine loads of places where this kind of shading would be just perfect. How about you? Where would you use this stitch and kind of shading? Have you used it? If so, do you like it as much as I do?
